We all have our favorite items of clothing that we wear over… and over… and over again.
Five years ago? I was running around like a sitcom character in the same clothes every day after discovering my favorite lightweight hoodie from Stateside…and buying four of the same color.
I still miss it. But I do have a little more color in my wardrobe now.
The point is….there’s nothing to be ashamed of if you’ve got a piece in your closet you’re married to. That is until the unthinkable happens: you get a thread that pulls loose…and a hole starts to show.
You’re sitting there thinking… “It’s not bad enough to toss. Maybe I can get just one…more…season..”
Rrriiiiip.
Lady, you’ve got to do something fast.
Most of the time, a little wear and tear is easy to fix. You don’t need experience, or a sewing machine. If you’ve read our article, Vintage Clothing Care Guide you know a little extra love can go a long way to making sure that your clothes look better for longer.
Which is a foundational part of working towards making your wardrobe more ethical. Fast fashion is a killer- for both the environment and women in other countries. That’s an article in itself though. Right now, we’re talking about solutions.
After you read this, you’ll be able to keep wearing your favorites a little longer. No sewing machine, no problem! All you’ll need is a basic hand-sewing kit.
How to Sew a Running Stitch
 First, let’s get started with the easiest and most versatile mending stitch: The Running Stitch.
Good news: You’ve seen it before. It’s the ground-level sewing stitch- from sewing on patches to hemming pants.
To start, thread your needle.
Start with around 18 inches of thread for most small to medium tears.
Knot the thread at the end.
Stab the needle through all layers of fabric from the underside. Pull the needle through and up, and then pierce again, horizontal from your first stab.
Then, repeat! You got this.
When you’re finished, knot the thread by sewing a loose stitch on the underside of the fabric, passing the needle through the loop created, and pulling tight.
For a demonstration, check out Mary Corbet’s Needle ‘n Thread.
Next Step Clothing Repairs: The Back Stitch
Once you feel comfortable with the running stitch? Consider its cousin: the back stitch. The back stitch is perfect for projects like:
- repairing rips,
- reattaching loose straps,
- and mending seams.
As its name implies, in the back stitch you’ll sew forward…and then go backward. Why? Doubling back gives your stitch extra strength and durability.
To begin, thread your needle and knot the end.
Then, pierce the fabric with your needle from the underside, going through all the layers.
Next, make your first stitch. Bring your needle through all the layers of fabric and back out again (see image below).

For your second stitch, go back to the end of your first and stitch. Just like the first time, bring your needle through all the layers of fabric and back out again. Repeat until your seam is done, and knot the thread.
For a full demonstration, check out this video from crafting blog Treasurie.
How to Sew a Button
Buttons do some heavy lifting. There’s a lot of movement, even at a desk job, and buttons are the go-to for keeping it all together. Although they do their very best, sometimes we stretch one too many times and they pop off.
Good thing putting a button back on is one of the easiest sewing repairs possible.
If you have the original button, go ahead and use it. If you don’t, get creative! You can sew on a button of the same size taken from another piece or pick up a whole new set to replace the full row at an antique or craft shop.
Personally? I’ve acquired my grandma’s button jar and it’s a great go-to for times like this.
Here’s how you do it:
To begin, thread your needle. For buttons, 12 inches is more than enough. If I’m using standard thread, like the type in a repair kit vs. embroidery thread, I like to double it over for extra strength. Be sure to knot it at the end!
Then, see if you can find where the initial thread attaching the button pierced the fabric. If you can reuse the original hole, do so.
Push your needle through the fabric, back to front, and through one buttonhole.
Make sure the button is properly centered before sticking your needle through the buttonhole that is diagonal from the first.
Sew 5 more stitches through the same two buttonholes.
Then, repeat the entire process with the remaining two diagonal buttonholes. You should stitch through them 6 times.
To finish off your button, use the same technique from the running stitch: sew a loose stitch on the underside of the fabric, pass the needle through the loop, and pull tight
How To Fix a Sweater Pull
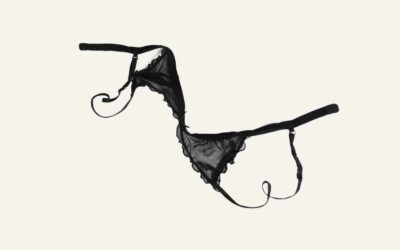
We love our comfy sweaters here at Refined By History. Chunky wool, fine-combed cashmere, vintage find or heritage handmade…you can never have too many. Unfortunately, the loose knit of the fabric makes these pieces easy prey for snagging bra clasps, nails, and seat belt buckles.
Guess what? Fixing pulls on loose knits only takes a few seconds. I’m serious!
To begin, flip your sweater inside out. Then, take a crochet hook and gently pull the loose thread into the garment.
Flip your sweater right-side out again and you’re ready to go!
How To Hem Your Own Pants
Finding a good pair of pants that makes you look and feel good is one of life’s greatest challenges. What happens when you come across your dream pair….but the legs are 3” too long and drag at the bottom of your heel?
You don’t have to pass them up. Hem those babies!
While hemming takes more precision than other basic mending, having the right length is essential for an easy, polished look. This might be a time to start a relationship with a local seamstress or tailor. Having a pair of pants hemmed typically costs under $20. But, if you want to DIY- you can. Here’s how:
To start, remove the original hem with a seam ripper.
Next, turn your pants inside out.
Fold the bottom of the pant leg to the correct length and pin it with straight pins. Stop right now and try your pants on before you sew!
Next, iron along the folded hem, creating a strong crease. Then, remove the pins.
Cut your pants along the crease, leaving a one inch “seam allowance” along the hem.
Once more, fold along the seam allowance, pin, and iron. Turn the pants inside out.
Finally, sew along the new hem.
You can use the back stitch, but for a less visible hem, try the blind stitch.
For the blind stitch, pierce the needle through the seam allowance, along the top folded edge. Next, make a very small stitch through the main part of the fabric. Then, bring your needle through the very top of the crease (see image below).

Repeat until you have finished the hem. After you tie off your thread, iron your hemline one last time for a crisp finish.
For more help with the blind stitch, take a look at this video from mother-daughter sewing team Needlepointers.
How to Darn by Hand
In the past, darning socks was a common practice for prolonging the life of these high-wear items.
Now? I use the darning technique as a way to salvage extra seasons out of much-loved sweaters or skirts.
The process takes patience- and time. Again, this might be another repair best left to a professional. Still, it’s not difficult and you can do it yourself with a basic hand sew kit.
What is Darning?
Darning is the process of mending a hole by weaving new “fabric” over it with thread. It takes care, but the basic concept is very straightforward and accessible.
To start, trim any frayed edges or lose threads. Then, lay the garment on a hard surface that mimics the garment’s shape.
If you’re darning a hole in the back of a shirt, you can lay it flat on a table. If you are darning your sock’s heel, you will want a darning mushroom to support the sock’s curve. In a pinch, a tennis ball works, too.
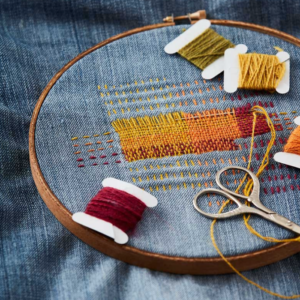
Next, thread your needle and knot the end. Sew rows of vertical stitches across the hole. You should keep the space between stitches very small.
Be sure that you start and finish your stitches at least ½ inch away from the hole to create a barrier against further tearing. You may also want to include stitches on either side of the hole to strengthen your darning.
Then, make horizontal stitches. Weave your needle over and under the vertical stitches (see picture above) to create a new woven patch.
You can use fine thread of the same color to make your darning almost undetectable, or you can opt for colorful, chunky yarn to make a fun statement, which brings me to my next point…
The Art of Visible Mending
When we think about repairing a garment, we normally look to hide our work. We want to make that rip disappear. However, sometimes damage may be too extensive to make “new” again.
Why not embrace it?
If you’ve ever put a fun patch over a hole, then you are already familiar with visible mending. Visible mending is a technique that views clothing repair as a creative opportunity, not a problem. It is a burgeoning field of crafting that is already taking over Instagram with #visiblemending.
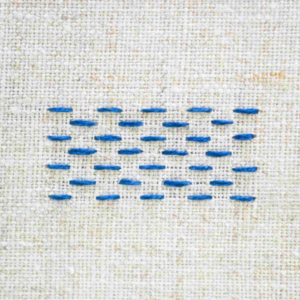
 Visible mending takes inspiration from a Japanese mending technique known as Sashiko, or “little stabs.” Sashiko mending uses contrasting fabrics and visible running stitches in bright colors, drawing attention to itself instead of fading into the background.
Sashiko values natural fabrics and shades that evoke the world around us: the green of the grass, the blue of the sea, and the brown of the Earth. You can stick to this traditional color palette or explore your own.
If you picked up embroidery during the pandemic, this is the perfect way to showcase your new hobby. Can you imagine something like Caitlin’s work over that hole in your pocket?
(Follow @virginia_blob on IG here)
When You Should Take Your Clothing Repair To A Pro
Not all repairs can be done by hand. Last year, I ripped a hole in the back of a vintage lace mermaid-style skirt with a heel and…well…no amount of handdarning was going to bring this beauty back to it’s former elegance.
Sometimes a visit to a clothing repair professional, such as a seamstress or tailor, is just what you’ve got to do.
Did I have to toss that lace skirt in the donation pile? Not at all! Just because you can’t fix something yourself doesn’t mean it can’t be fixed.
Here’s when you need to take your clothing to a professional:
#1: Replacing A Broken Zipper
A bit of beeswax will keep a metal zipper running smoothly, but the process of replacing a broken zipper is difficult. If you’re comfortable with sewing and have access to a sewing machine, it’s possible. However, new DIY-ers will want a seamstress’ help.
#2. Alterations (More Than Just Hemming)
If you need seams let out or taken in, you want a professional to handle it! Good alterations can help a garment accommodate your body’s natural changes. Not to mention, when your clothes fit like a glove, you look and feel like Grace Kelly.
#3. When You’re Dealing With Difficult Fabric
In How to Care for Vintage Clothing, we mentioned a few difficult-to-care-for fabrics that always require a professional’s skills, such as crepe silk or rayon, velvet, lined wool, leather, and suede. Chiffon is also a very difficult fabric to handle, and amateur stitches will stick out like a sore thumb. When in doubt, head to your local tailor.
#4. High-End Garments
Your favorite suit and your go-to Chanel cocktail gown are in a different league than that vintage funky polyester button down. You’ve made an investment in your wardrobe and you want repairs that leave the item looking new. If it’s more difficult than a button, go to a professional to make sure that the mending does the garment justice.
Repair and Rebel: Keep Quality Pieces Longer and Reject Fast Fashion
There are plenty of ways to keep your favorite outfits with you longer, from quality cleaning practices to mending simple wear before it becomes a larger event.
The best part?
By learning how to make a few easy repairs yourself (or starting a relationship with a great local seamstress or tailor), you’re contributing to an important economic and environmental cause: standing against fast fashion.
Consider this:
How much of your clothing ends up in a landfill?
According to a study done by the Business of Fashion, 3 out of 5 fashion garments end up in a landfill within a year of being purchased.
Not only that, but 93% of fashion brands don’t pay their employees a living wage.
Need more reasons to say no to fast fashion?
The fashion industry is responsible for 8-10% of greenhouse gas emissions. This number is projected to increase 49% by 2030.
When you repair clothing, you aren;t just restoring a favorite outfit. You’re helping to put a stop to the environmental damage and cruel working conditions created by the fashion industry.
You’re making a difference.
Next time you rip a skirt, lose a button, or get a hole in your sock, skip the trash. With a little extra time, some basic skills, and, occasionally, some professional help, you can save that garment for years to come!